by Richard Waine
Do you ever tell people that you’re a “natural light photographer,” because you don’t really know other ways to light a subject? Do you constantly make excuses to shoot outside or not at all? Most photographers have experienced this or a similar situation at one point or another. I will try to “shed some light” (pun intended) on the concepts surrounding lighting.
We all know that light is necessary to create beautiful portraits. How much and what kind of light, is a creative decision, which only you as the photographer / artist can make. But, did you know that a lack of light is also necessary? I’ll explain: The lack of light (or shadows) creates dimension, texture and drama within an image. Perhaps you want to light some areas of a photo, and leave others in shadow. Playing with your lighting techniques and tools will aid in creating some very interesting elements to your photos.
Histogram:
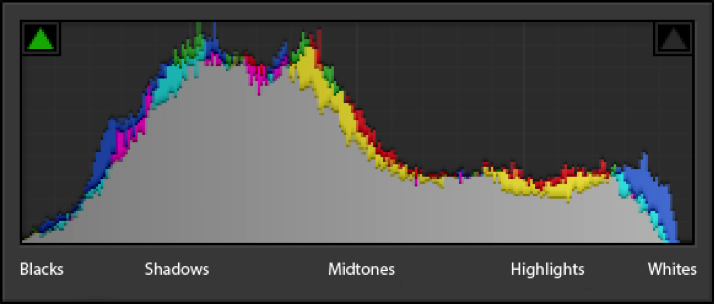
What is a Histogram? No, you don’t need a prescription from a doctor for one! Take a deep breath! These things aren’t as complicated as they sound. A histogram is simply a graph of the colors, exposure and lighting of your image. It has been said that a “perfect” histogram should present like a bell curve with its peak in the middle of the histogram. This is not a steadfast rule. In fact, using a histogram can be misleading, but it IS a very useful tool. In my opinion, all you really need to know is that your histogram will gauge how much light you are capturing in your photo. If your histogram is skewed to the left, your image is too dark. If it’s skewed too far to the right, it’s too light. Beyond that, use your creativity to create beautiful images.
Nuts and bolts:
Light helps us adjust for shutter speed, for ISO and for aperture. That’s great! What on earth are you talking about?! If we have the required light, we can increase shutter speed. That’s a plus! We can decrease our camera’s sensitivity to light, which reduces noise. That’s another plus! And we can bring our f-stop towards the sweet spot of the lens. As you open the aperture wider, you let more light in. But if you have the required amount of light, you can raise that f-stop (closing the aperture blades) to something where the depth of field will be more defined. This will create dimension. Whenever possible, I advise using a tripod. Camera shake is the leading cause of blurry photos, and of heart attacks among photographers! Reduce your stress, use a tripod! Besides, you’ll be able to reduce your shutter speed, and raise your f-stop, thereby increasing depth of field. Plus, you’ll have sharper photos.
White Balance:
Looking for cool tones, or maybe some warm tones? White Balance is difficult enough to understand. So I won’t tell you how to set your camera. The instruction manual can help you with that. What I can say is that the higher the number goes, the cooler the color temperature will get. Conversely, the lower the number goes, the warmer the color temperature will get.

What does this tell us? We measure our lighting by the Kelvin scale. We know that daylight balance (not directly in the sun) is 5500k. In fact our studio light bulbs have Kelvin color temperatures assigned to them as well. If you are using fluorescent bulbs, chances are, they are listed at 5500k. If you are using Tungsten bulbs, they are probably around 3200k. Based on this information, it’s safe to say that if you want warm tones, Tungsten is your avenue. However, most photographers tend to go with fluorescent, because they don’t run AS hot. Don’t worry, you probably won’t set a fire or cause your subject to melt with a tungsten bulb, but they do get warm.
So, which way do you go? Unfortunately, I have no recommendations for you. And neither should anyone else. In fact, you can easily combine ambient light (available light) with strobes, flashes or even continuous lighting. This is just another creative decision for you to make.
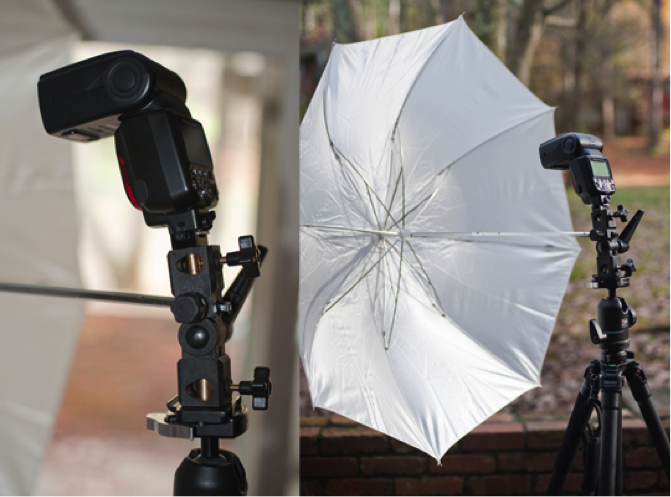
Now that we have established color temperature and the need for light (or lack of light), what’s next? Most of us, at some point, have either used or purchased a speed light. Yep, it’s the light that attaches to your hot shoe. It’s the kind of light that makes you look like you know what you’re doing.
What if we were to take the speed light OFF the camera, and mount it on a tripod? And, what if we triggered that light from a few feet away, while we took photos of our subject from a different vantage point? What would you call it? Technically, it’s still a speed light. Fundamentally, it is really a strobe.
A strobe? Yes indeed, a strobe! It emits a burst of light. We snap the photo during that moment the light is cast over our subject, and then, like magic, the burst is over, and the moment has passed.
Give this a shot: If you don’t have a studio set up, and need some flexibility with lighting, try a few speed lights mounted to tripods. Granted, you’ll need to find a way to trigger the speed lights, but you will have accomplished quite a feat in removing the light from the top of your camera. Why is it feat? It’s a feat because you are creating a light source from an angle that wasn’t possible before you removed the light from the hot shoe. This opens up your photography to a wide variety of possibilities. (Don’t forget, tripods can move too!).
If your speed light can function as a strobe, what about studio strobes?
Let’s examine an average, run of the mill strobe set up. Imagine, a really big speed light, encased in a quasi-tubular or cubic fuselage. So eloquent, I know!
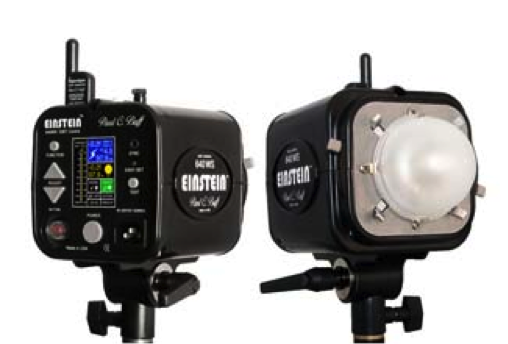
Strobe lights deliver a powerful burst to light your subject. They tend to have knobs or sliders to control the strength of the light emitted. This is added flexibility, which you won’t often find on continuous light sources.
The strobe’s strong, short bursts of output allow you to maintain a low ISO, reducing noise and enabling your digital sensor to produce the best image quality. Because of this flexibility, you have greater control over the aperture setting. Increasing the power of the strobe will allow you the ability to increase your aperture. Reducing the power of your strobe will allow you to reduce your aperture (opening up the aperture blades) to f/5.6 for example, and wider.
Triggers:
This is where most people tend to feel like they are in the movie “The Exorcist.” Heads are probably spinning around, and there are tons of questions on the subject. I won’t delve too much into the technicalities. I’ll simply say that if you want to go with studio strobe lighting, be prepared to invest in triggers or transceivers and receivers. A “transceiver” can receive and transmit a signal, while a “receiver” can only receive signals. For quality transceivers, you might be spending around $100-300 per unit. Unfortunately, in order to make this set up work, you need one for the camera, and one for each strobe you want to use. Yes, there are “wired” ways to trigger the strobes. But we live in the 21st century!
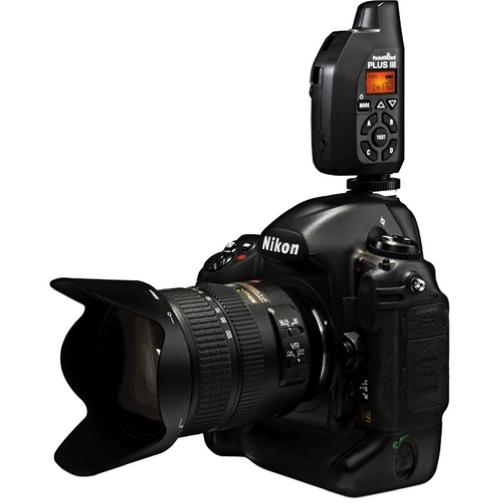
Essentially, when you set up the transceiver, which sits on your hot shoe, it will communicate with the transceiver or receiver on the strobe, and tell it to emit a burst of light. The wireless nature of this set up allows you flexibility and mobility. Once you set things up to your creative preference, it is really quite easy to use. Sound easy? I think so! The complicated part is in reading the instruction book! We are all guilty of neglecting the manual, but it will guide you in setting up your equipment, and step you through any trouble shooting you might need. Enough said.
Continuous light:
Continuous light is a fantastic option for budget conscious photographers, who don’t really want to go through the fuss of setting up strobes, triggers, power levels, etc, etc, etc. If flipping the switch to the “on” position is more your speed, then this is your option!
Continuous light is exactly as it sounds. The light stays on while you shoot. There are no bursts, unless you blow a light bulb. There are no triggers, and the only complexities will be in how you want to shape and modify the light.
Continuous lighting will allow you to see exactly how the light is shaped and how it will fall on your subject, before you even touch the shutter. Sound easy? I think so. Sure, you’ll take a few test shots, and get your white balance, ISO, shutter speed, and aperture settings in order. But, when everything is set, all you need to do is shift your light sources around. That sounds like a really easy way of accomplishing some effective lighting, and beautiful images.
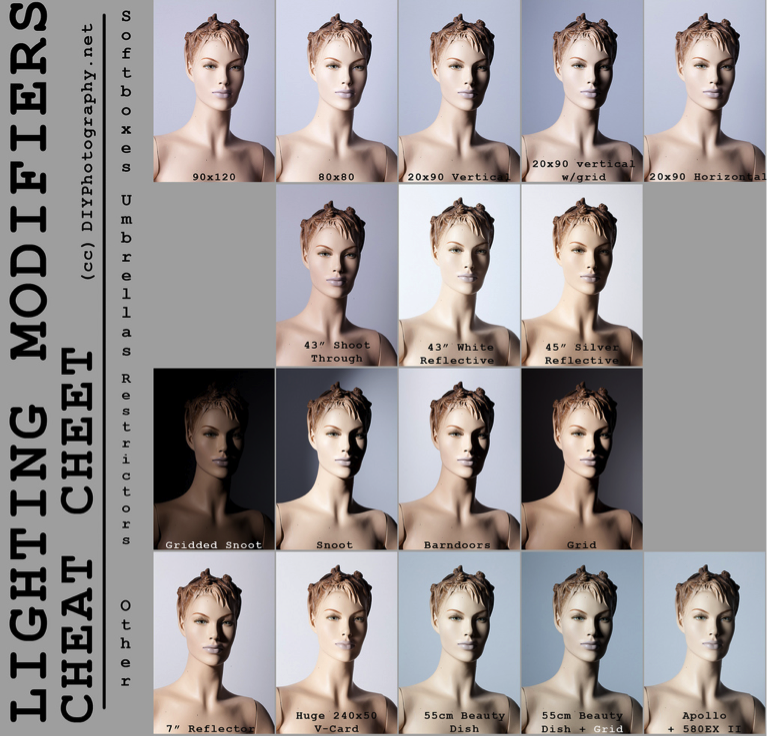
Modifiers:
For the novice, these can be a bit intimidating. For the advanced photographer, these are necessities. There are a wide variety of modifiers available and each can contribute something incredibly different to your images.
Softboxes are fantastic tools for diffusing a light and spreading it over a subject. They come in various dimensions and shapes (square, octagon, rectangle), and can be used in many creative ways. Each will provide a different characteristic to the overall image.
Softboxes have interesting characteristics in that, the larger they are in relation to a subject (the closer it is), the softer the light will be. The diffusion of the light is what makes this possible. Conversely, the smaller the softbox is in relation to the subject (the further away it is), the harsher the light will be.
Umbrellas are also very useful. There is a common misconception that umbrellas are for novices only. News flash! Pros use umbrellas regularly. They are fantastic tools, and when used in concert with other modifiers, will give you added flexibility. A shoot through umbrella will diffuse the light, while a reflective umbrella will bounce light back onto the subject, but in a wider array.
Give this a shot: Take a shoot through umbrella, set it up with umbrella itself facing the subject, so your light source will be shooting through the umbrella. Make sure the shaft is pointed at your subject’s nose. *note: adjust your umbrella shaft in its bracket, so that your light is using the entire umbrella. We don’t want to waste any light!
If placed properly, your shoot through umbrella has just become a large beauty dish! Imagine the catch lights you’ll create!
Another neat idea is the use of color gels. Technically, they are modifiers, which change the color your lights will cast. I would use these sparingly, but when you do, they can create some really neat effects.
Perhaps throwing a smoke machine into the mix, a colored gel backlight, and an octobox key light will render a memorable portrait?
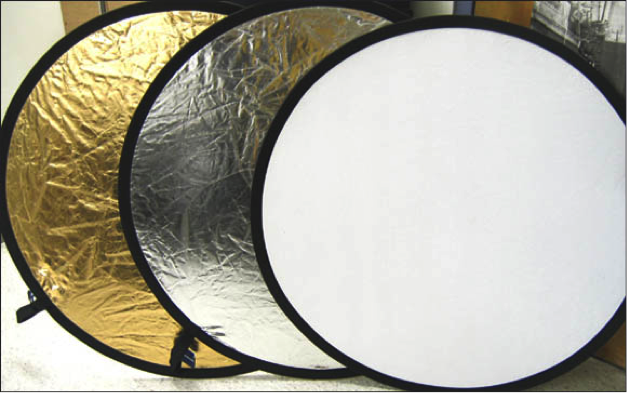
The most useful tool in the arsenal of modifiers is probably the reflector. This is not only a cost effective way of replicating a light source, but also serves to fill in shadows, or create just a hint of light where needed. It will not illuminate a backdrop or create a hair light / rim light. Reflectors usually come with different panels, which can be used to cast a different color light on your subject. For warmer tones, go with the gold panel. If you need something brighter, go with silver. The options are plentiful and the possibilities are endless. If you don’t have one, I strongly suggest investing in one.
Setting up your lights:
I cannot tell you that anything I describe is a hard and fast rule. These ideas are merely a guide. You can, and should alter them to suit your needs and creative purposes.
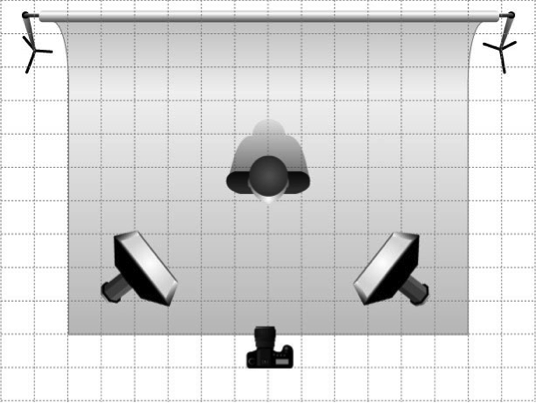
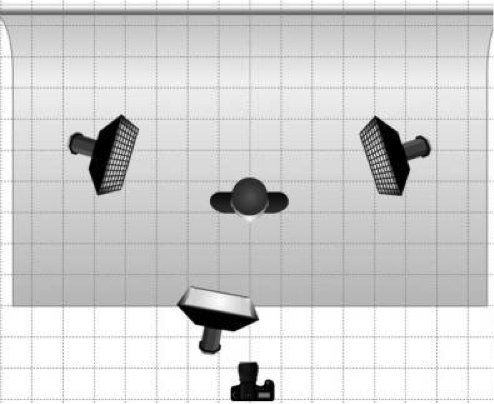
The image below is a basic lighting setup. You’ll notice that each softbox is placed 45 degrees to the left and right of the camera. This is a good starting point. All things being equal, you can keep this lighting set up, and change how your subject is posing, and you will notice a tremendous difference in the image.
Lighting set ups can get quite complicated. With all of the softboxes, light sources, umbrellas, gobos, flags and reflectors, how on earth do we figure out what works best?
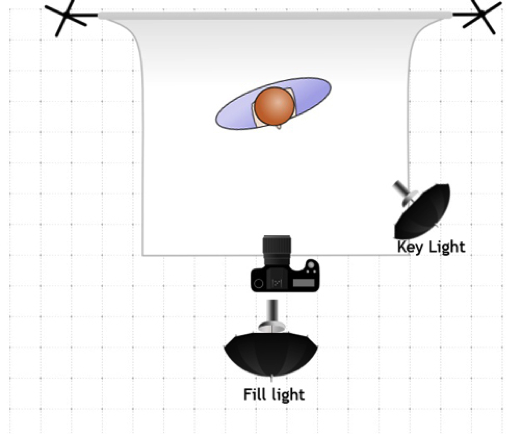
My recommendation is to start small. Try setting up one light, and place it either in front of your subject (and shoot from beneath the light source), or to the side of the camera. If you choose, add a “bounce” aka a reflector directly opposite (diagonal) the light source. Play with these concepts. You’ll be amazed at how much of an impact the small adjustments will have.
Remember, you can always add flags, which will absorb light (or block it out) to create shadows. You can add reflectors to add light.
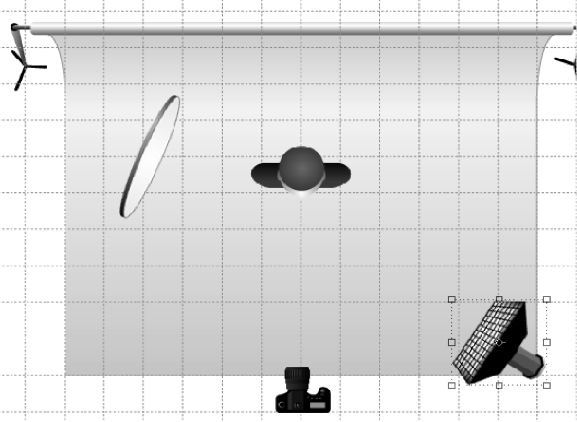
Give this a shot: Try setting up a softbox relatively close to the ground, and pointing it up at your subject.
*Note: it’s not always flattering to shoot the photo from this angle. However, the lighting will be interesting.
Add some drama to the lighting scheme by using two softboxes on each side of your subject. This time, use a honeycomb grid on each softbox to direct the light. Softboxes are diffusers. Using the grids will direct the light onto your subject, creating more highlights and shadows. With a beauty dish, umbrella, or softbox/ octobox in front of your subject, try shooting this portrait!
The key to creating good images rests in the idea that everything can be moved and altered. If you choose to hold your camera, you must realize that you have legs. The camera can be moved. The speed lights, strobes or continuous lights are on stands, they can be moved as well. Most importantly, your subject can be moved.
While lighting is very important to making flattering images of your subject, you must pose your subject properly, and shoot them in flattering context. What do I mean?
I mean there are two sides to an illuminated subject: the short side and the broad side. What’s the difference? The short side is where the side furthest from the camera gets the main light. The result you get when using this lighting technique is a thinner appearance. This is the more flattering lighting technique, and thus why it is used for plus sized subjects and women. The broad side lighting technique is when the main light is positioned in such a way that it illuminates the side of the face that is turned toward the camera. This technique will distort facial features and is used mostly to make thin, narrow faces appear wider.
Catch lights:
Catch lights are super important in portraiture. The eyes are not only the gateway to the soul, but they also set the mood. They convey emotion and captivate the viewer. The eyes cast a reflection of the light source, and add depth, dimension and life to the photo. Moral of the story: Do everything in your power to bring out the catch lights in a portrait. Doing so, will make your photo stand out!
I will leave you with this note: Some of these concepts might be fundamental and quite basic. Others are more advanced. Is there room to elaborate? Of course! I touched on a wide variety of topics, each contributing to the overall use and manipulation of light. The goal of this entry is to get you thinking about the vast possibilities available to the creative mind, and the use and manipulation of light.
There are a ton of other techniques, tips, tricks and solutions available to the creative photographer. If you’d like to learn about specifics topics, I’d love to hear your thoughts
Richard Waine is the proprietor of Richard Waine Photography, a portrait and lifestyle studio based in Pennsylvania. For information, sessions, or just to chat, please visit: http://www.RichardWainePhotography.com